Thursday, December 30, 2021

Reflecting on 2021 and Welcoming 2022


The end of one year and the beginning of the next is a wonderful time to reflect on goals accomplished and to set new ones for the upcoming year.   I recently shared my Best of 2021 post and now I'll be liking up to #2022PlanningParty.   

I've filled my post with some eye candy of finishes from the past year.  (There are more in the Best of 2021 post.)


Year 2 of the pandemic was both easier and harder than 2020.  Vaccines offered relief and hope for getting back to normal but reality was Covid is still with us.  As a family, we still stay home as much as possible - certainly more than we did pre-pandemic - which means more time for quilting and blogging.


In December of 2020, I set my goals for the 2021 and updated mid-year on my status.

For 2021, I choose the word seek - as in seek new challenges in quilting and seek opportunities to connect and collaborate with others.  So how did I do?

  • Experiment with color and design and play outside my comfort zone.  I made 2 quilts to really stretch me here - the first is called Left Turn, made using wasabi and purple as the primary colors both of which are way outside my usual palette.  Left Turn (which I've yet to blog about) was juried into QuiltCon!  The second is I Believe in Dragons - my blue improv quilt with touches of orange made for my guild challenge and also juried into QuiltCon.    Calling this goal a win!
  • Seek inspiration everywhere and work to provide through my blog posts (tutorials, OMG etc.) - I fell really good about the blog content I published this year - from the hand pieced QAL and associated tutorials to the One Monthly Goal link-up where other quilters can find each other.  Calling this goal a win!
  • Establish a social media plan - when and what to post - Calling this near miss but not beating myself up for it.  I publish quite often on my blog and while the goal here was to do better with Instagram, I am fine that this is not my go to share spot.  So maybe this is a win after all because I figured it out!
  • Collaborate with another quilter(s) on a QuiltCon submission - Calling this a definite miss - maybe next year!


For 2022, my word is simplify.  The world is a complicated place and I want to simplify wherever I can and shift my energies to things that are the most important to me.  

My goals for the year: 
  • Make at least one quilt to submit to QuiltCon 2023.
  • Join a QAL to create a charity quilt only using fabric from stash.
  • Submit a quilt design for publication.
  • Play with color to make a improv mini quilt.
  • Blog 1-2 times weekly and continue to host OMG (but without sponsors.)
My goals are more focused than in past years.  Although it could change in the future, I've no plans to host a QAL this year and will be running OMG without sponsors.  I enjoy hosting OMG but want to try it without the hassle of chasing sponsors and prize winners.


I know I'll keep myself busy with projects - sewing quilts and bags brings great joy to my days and I so look forward to the 'me' time with my sewing machine!

Happy New Year and best wishes to you for a wonderful 2022.  I truly appreciate everyone who reads my blog and participates in OMG.  Thanks for being there.

I'll be linking up to Yvonne's #2022PlanningParty.   

Have a wonderful day! Patty

Monday, December 27, 2021

Best of 2021

Each year, Cheryl invites bloggers to join the best of 2021 link-up and share their 5 best blog posts of  the year.   And the best part?  We get to define what 'best' means!  

 My best of 2021 all correlate to some major things that happened in my quilting life and documented on my blog.  They are listed in no particular order.

QuiltCon Together:  Having 4 quilts juried into the virtual QuiltCon Together quilt show was certainly a highlight for the year!   Read more about my thoughts and highlights from the show

Top row:  Boomerang and Carnival;  Bottom row: Cartwheel and Astro

Publishes: I had quilts featured in two different magazines.  Boomerang was featured in the QuiltCon magazine.  This was a big thrill for me - I really enjoyed every aspect of creating the quilt and to have it as one of the quilts in the magazine was very exciting.   I also had an article on One Block Scrap Quilts appear in Make Modern Magazine.


Hand Piecing QAL:  Kristin and I ran our third hand piecing quilt along with our quilt Harmony.  Harmony is composed of a single large block that creates a secondary pattern as you join additional blocks together.  (See the pattern.)  Collaborating with Kristin on our QAL was certainly a highlight for the year.


Quilt Coat - My absolutely favorite make of the year was my quilt coat.  I made a lot of geese and created the panels that turned into the quilt.  On my blog, I I shared the process of creating the panels and the pattern prep (part 1) and then shared the assembly process (part 2) and then the finish!  I love my coat and wear it almost every day.  It is warm and perfect for layering underneath.


Improv - I made a lot of projects this past year - bags, quilts and coats - including one quilt I haven't yet shared.  One of the quilts makes I had the most fun with was my I Believe in Dragons quilt.  Created for my guilds improv challenge - where it tied for viewers choice securing my first ribbon :-).  It was also juried into QuiltCon 2022 which both surprised and delighted me!


I also had the chance to take an improv class with  Jacquie Gering  which was awesome.  You can read about it and see my mini improv study on this post.   Improv hasn't been my first choice when I sit down to make a quilt.  But I've learned from the mini and the project from Jacquie's class is that I really enjoy the process which is a reason to try it some more!

I enjoy participating in the link-up each year even though it is always tough to choose just 5 highlights.  You can find my previous yearly top 5 here:  20202019,   201820172016

Have a wonderful day! Patty

Sunday, December 26, 2021

One Monthly Goal December Finish link-up

Ready to link up your November finishes?
Don't panic - this link-up is open until December 31 at 11:55 pm ET.


My goal for December was to make a quilt to enter into the latest Curated Quilts mini challenge Energize.  I ended up making 2 quilt!  (Read more about them here.)


Now it's your turn to link-up!  There will be 2 winners - Fat Quarter Shop is offering a $25 gift certificate and Oliso is offering a mini-iron!

Congratulations to Barbara and Donna - the lucky winners for this month!  (updated 1/2/22)


Visit the One Monthly Goal event page for the specific requirements for links and social tags. 

And remember, to be eligible for the prize(s) by random drawing you must linkup at both the goal setting and the accomplishment linkup in a given month. (December Goal Setting Link-up)

Make sure you add a link to this OMG post so others can follow where you are linking.   Let's make that easy -  just paste this into your post:  


Thanks for linking up!

You are invited to the Inlinkz link party!

Click here to enter
Have a wonderful day! Patty

Monday, December 20, 2021

Red Alert and Protons


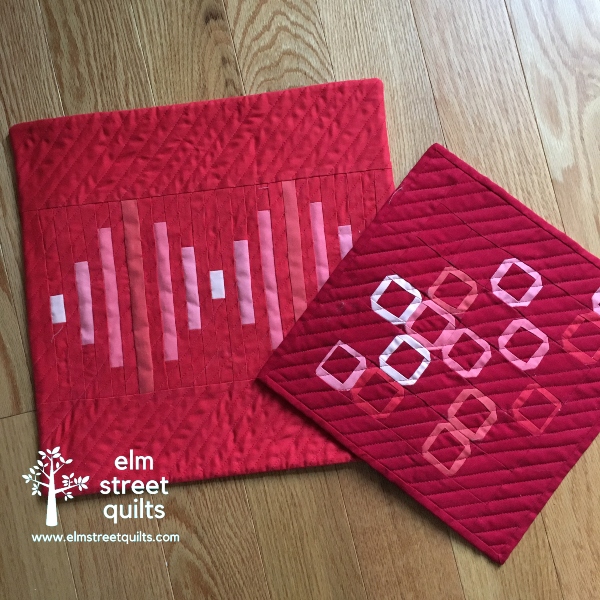
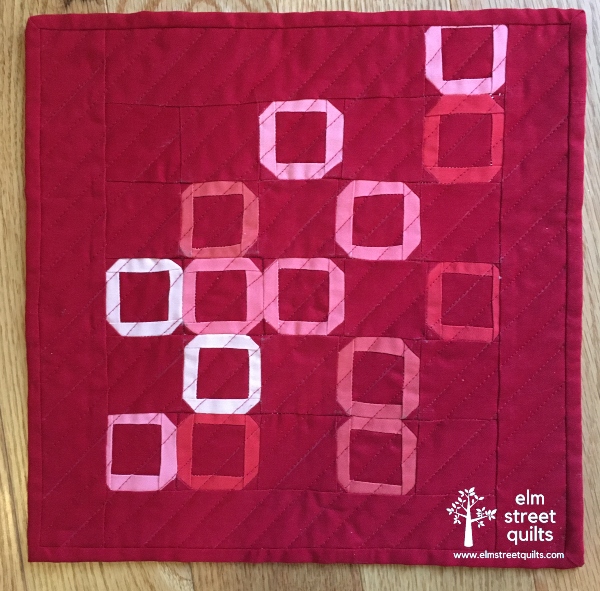
The prompt for the latest Curated Quilts mini-quilt challenge was 'energize' and the color palette is a monochromatic red.  I've entered several of the Curated Quilts challenges (one entry was included in the Polygon issue!) and decided to purchase a FQ bundle from Curated Quilts so I had all the lovely shades to play with - Moda Country Red, Scarlet, Persimmon, Flamingo, Tea Rose, and Bubble Gum.


Red Alert is 14" square and used almost all the colors from the starter bundle.  When I first heard the energize prompt, I thought Star Trek (as one does) and from there red alert.  Red alert is the highest emergency on a Starfleet ship and results in red flashing lights and a loud alarm noise.  Although the red alert displays have gotten more sophisticated since the original series, my quilt is imagines what the light waves look like from that red flashing light.  (For the record, I did just binged every episode and movie from TOS, TNG and Voyager, Picard is the best captain.  Just saying.)


Protons is 10 1/2'' square and used all the colors in their starter bundle.

Remember back in middle school when you made 3D models of an atom?  Think protons and neutrons nestled together inside the nucleus with electrons zipping around modeled as balls of class held together with toothpicks.  When the curved ring shape and the resulting random shape popped into my head, I thought of these tiny positive charged particles, hence the name of my mini!

Have a wonderful day! Patty

Wednesday, December 15, 2021

Let It Snow


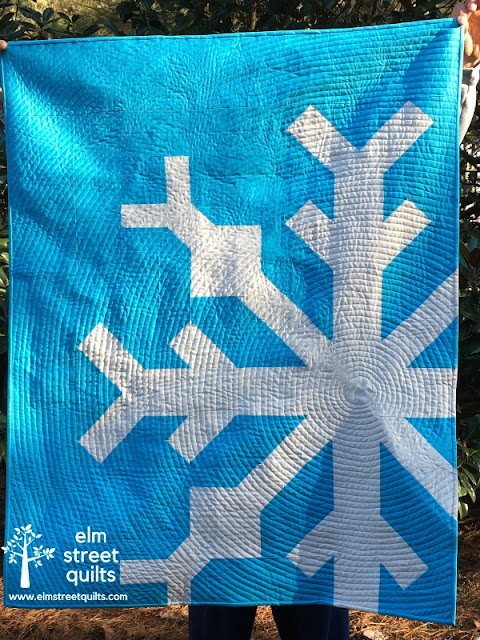
When the snowflake pattern by Modern Handcraft started showing up in my social feed, I knew it was a quilt I wanted to make.  It was pieced awhile ago but just recently did the quilting and finally the binding.

I rarely make quilts from patterns preferring to play with my own designs.  I did do some basic quilt math on this one - make it a bit smaller to work with the smaller stash of Moda Sweetwater white snowflake fabric I had in my stash.  My version is 40" x 48" which makes a nice wall hanging or a small throw.

I did a spiral with my walking foot starting in what would be the center of the snowflake.  I still may go back and FMQ the rest of the spiral in the center instead of leaving that unquilted circle.

It took a bit of extra time, but I pieced the binding so the snowflake would flow out to the edges!


You can find the pattern here on the Modern Handcraft shop or here at Fat Quarter Shop (affiliate link)  

P.S. We don't get very much snow here in NC - although sometimes we do actually get a LOT of snow or sometimes the snow we do get makes a big mess.   The photo below - taken during a 2014 storm - exploded on social media.  My guess is you've seen it - it became a meme, my favorite being the one with the monster from Ghostbusters added to the image.  (See it here)


Have a wonderful day! Patty

Monday, December 6, 2021

November Temperatures


Creating a temperature quilt is a great way to reflect back on the year.  I enjoy the process so much and teaming up with Mother Nature on a design makes things interesting.  Our NC November weather turned cold for about two weeks -just in time for me to be able to wear my quilt coat on a daily basis - and now suddenly in December, we got back to temperatures in the high 60s and low 70s.  


Where it gets really interesting is the year to year compare.  November 2021 (right) was actually much colder than November 2020 (left).  All those greens are highs in the 70s while those various shades of blue this year were highs in the 60s and 50s.


My design documents both the high and low temperature in a block which finishes 1 1/2 '' x 2''.  The improv strip is 1/4'' wide and records the low temperatures.  

Every month takes 2 columns - the 1 through 15 in first column and then 16 through end of month in the second column.  Filler blocks are added to square off the quilt.  The thin strips - 1/4'' wide - are randomly inserted and run 'vertically' for odd days and 'horizontally' for even days.

I'm using the exact same fabric that I did for my 2020 Temperature quilt.  The time I spent organizing is paying off - it takes no time at all to get the prep work done for sewing each block.  I made myself a mini-quilt to show off my temperature grid.  Oranges are 80s, yellows are 70s and sew on.  I've been asked several times what my fabrics are - I used all Painters Palette solids:
100+ is Sangria, 95+ is Real Red, 90+ is Poppy red, 85+ is Burnt Orange, 80+ is Tangerine, 75+ is Pencil Yellow, 70+ is Bright Yellow, 65+ is Apple Green, 60+ is Mint, 55+ is Bright Aqua, 50+ is Turquoise, 45+ is China Blue, 40+ is Lapis, 35+ is Purple, 30+ is Amethyst, and any temp is the 20s is Royalty.


I've written up my basic temperature quilt process in my tutorial including where I source the high and low information.  I'm looking forward to sharing the progress!  You can see my temperature quilts for 2018, 2019, and 2020!


Have a wonderful day! Patty

Friday, December 3, 2021

Free Motion Quilting with Rulers


What do these quilts - Tangram, charm square baby quilt, and I Believe in Dragons - have in common? 

I did ruler work with my new FMQ ruler foot!

Most of the quilting I do is with a walking foot - I love doing a spiral!  I have a few FMQ motifs down too which I might do on a baby sized or smaller quilt.  But, I've been wanting to learn how to FMQ with rulers for awhile but struggled to figure out whether there was a proper foot for my Janome 6600 MC machine.  After a call with a really helpful dealer, I was able to find the right foot - I bought this FMQ foot for high shank Janome machines.


There are many choices for rulers out there and I decided to start with a ruler that would help me do straight lines and purchased this Creative Grids FMQ ruler Slim designed by Angela Walters.

Before starting on the actual quilt, I did have to adjust the foot height because the fabric wasn't moving smoothly on my test sample.  (On my machine, there is a knob I hadn't known existed for a long time on the side of my machine.)

For my first attempt, I added stars to this baby quilt in the background between all the charm squares.  Since the FMQ ruler foot also works just fine as a regular FMQ foot, I was able to do a basic meander until I came to a spot where I used the ruler to make the star or some random straight lines in some areas that weren't quite large enough for a star.


After making those stars, I was ready to tackle a lot more ruler work - it was a lot of fun. 

For my Tangram quilt, I used the ruler to quilt inside each of the blocks.  I felt (almost) like a professional quilter as I went back and forth and was rewarded with little threads to bury and no turning the quilt round and round.  (The background was quilted with my regular walking foot.)


My improv quilt - I Believe in Dragons - had lots of ruler work in it too (along with some hand quilting.)   I really enjoyed not having to bury a lot of threads!  Since the quilting went in all different directions, I drew out some chalk lines to help me remember which direction I wanted the quilting to go.


I found this particular Creative Grids ruler (Slim) to be a nice size to hold in my hand.  The markings in both white and black were helpful to line it up regardless of what color the fabric underneath was.  The back of the ruler had some spots which helped it to grip to the fabric.  I just ordered another ruler that will give me the opportunity to do some curvy ruler work - can't wait to give it a try!

Using the ruler was really fun to get straight lines in smaller spaces and I was thrilled to have only a few threads to bury.  There are plenty of tutorials out there on how to use rulers - I watched a few of them, especially by Angela Walters - before I go started.

Have a wonderful day! Patty

Wednesday, December 1, 2021

December One Monthly Goal


New to One Monthly Goal?  Welcome!  To join, share a photo of your project, some words about what you want to accomplish in a blog post, an Instagram post or a post on Flickr and add that photo to the link-up.  Return at the end of the month and share your results.  You can read about the event and the rules on the main event page.

We have wonderful sponsors this month - two (2) winners will be randomly chosen from those who join both the goal and the finish link-up!


Fat Quarter Shop offers a tremendous selection of fabric, notions, books and just about anything you will need for your project. Consider their Sew Sampler box to receive a monthly surprise delivery of fabric and fun.  Fat Quarter Shop is offering a $25 gift certificate to one lucky participant.

Oliso reinvents products that surprise, delight and simplify life including the Oliso Mini Project Iron™ which brings you the power of a full size iron in a compact design for home and away.   Oliso is offering a Mini Project Iron to one lucky participant.  

My goal for December is to make a mini to enter into the latest Curated Quilts challenge with these pretty selection of red fabrics.


Make sure you visit the One Monthly Goal event page for the specific requirements for links and social tags.  Your blog post (or Flickr post) must contain a photo of your project, a clearly stated goal and a link back to Elm Street Quilts.  Your Instagram post must include a photo of your project, a clearly stated goal and the tag #onemonthlygoal.  (Entries which don't contain the required information may be disqualified.)

And remember, to be eligible for the prize(s) by random drawing you must linkup at both the goal setting and the accomplishment linkup in a given month.   (The One Monthly Goal accomplishment linkup will be available on December 26.)

Make sure you add a link to this OMG post so others can find the OMG link-up from your blog.  Let's make that easy -  just paste this into your post: 


You are invited to the Inlinkz link party!

Click here to enter


Have a wonderful day! Patty

Wednesday, November 24, 2021

One Monthly Goal November Finish Link-up

Ready to link up your November finishes?
Don't panic - this link-up is open until November 30 at 11:55 pm ET.


My goal for November was to make my quilt coat!  I love it!  You can read more about the coat and the process on this post.


Now it's your turn to link-up!  There will be 3 winners - Fat Quarter Shop is offering a $25 gift certificate, Aurifil is offering a thread pack, and Make Modern Magazine is offering a 6 month subscription.

Congratulations to Isis, Edith, and Mary - the lucky winners for November.  (updated 12/6)


Visit the One Monthly Goal event page for the specific requirements for links and social tags. 

And remember, to be eligible for the prize(s) by random drawing you must linkup at both the goal setting and the accomplishment linkup in a given month. (November Goal Setting Link-up)

Make sure you add a link to this OMG post so others can follow where you are linking.   Let's make that easy -  just paste this into your post:  


Thanks for linking up!

You are invited to the Inlinkz link party!

Click here to enter


Have a wonderful day! Patty

Monday, November 22, 2021

St Gregory's Cross Block

Fat Quarter Shop asked me and several bloggers to make a version of the St Gregory's Cross Block!  You can download a free block pattern here from Fat Quarter Shop and check out photos of other block versions today on their blog.  (In January, Fat Quarter Shop will be sharing all the photos from us but we were encouraged to share out blocks now.)


To construct the block, I used the Creative Grids 6" Flying Geese ruler!


I love making the flying geese block and typically make geese using the 4 at a time method and trim to size afterwards.  With this ruler, you cut out the center goose triangle and then the wings separately. 


The ruler gives you the opportunity to make geese 6" high down to as 1/2" finished.  The ruler was easy to use but I found maintaining cutting accuracy was difficult when I start making smaller geese using the ruler for another project.

Once assembled, this geese still needed trimming primarily to get rid of any dog ears.

The instructions for this block show construction slightly different than the way I approached it.  Since I had a tool to help me make flying geese, I constructed as much of the block using flying geese as possible.  Hour glass block needed in the center?  Two flying geese it is!


I do like this block and think it would create a great pattern across a quilt.  Fat Quarter Shop is offering a kit to make a St. Gregory's Cross & Hourglass Quilt Kit - check it out!  You can also order just the pattern to make the quilt or just the instructions block.  


Have you tried the Creative Grids Flying Geese ruler yet?

Have a wonderful day! Patty

Monday, November 15, 2021

The Making of My Quilt Coat Part 3 - The Finish!

Ta da! 


Earlier this month, I shared the process of creating the panels and the pattern prep (part 1) and then shared the assembly process (part 2).  Today, I want to share my finished quilt and some more learning and overall tips.  The pattern is the Patchwork Chore Quilt by Patchwork and Poodles and followed the extra instructions for a zipper (see instructions).


I am just thrilled with the finished coat!  I made the large size and it is a generous large - I'm pretty sure I could have made the small and been happy with the result.  I do like to layer up in the winter so I think it will work out fine.

The pockets, the zipper, and finishing the armholes gave me the most trouble.  (no photo)

The first time through the zipper installation process, I used a zipper foot and did not use enough pins.  As a result, the geese did not line up well.  Hard to describe - and I didn't take a photo - but somehow in the topstitching process I ended up with only the two bottom rows being aligned and the rest was skewed quite a bit.  Once the zipper was removed (took me almost 3 hours), I was relieved to find that the geese did actually line up just fine.  For the redo,  I decided to go with a binding and then topstitch it down on top of the zipper.  I'm really happy with how it looks - the geese are lined up and there is none of the zipper tape showing.


The process of sewing the bias tape over the seams was tough in the armhole.  It isn't my best work but I got the job done.

The pockets are constructed by sewing the lining to the front side and then turning inside out.  This means you are dealing with bulk in the corners which is difficult to lie flat.  If I make a coat again, I will bind the pockets to get nice crisp corners.   I am also unhappy that the geese don't line up vertically.  I kick myself for not making just a few more geese to give me options on cutting the pocket.  But, at the time, I thought I was going to be able to line things up just fine.   Might I remove these pockets and redo them?  Yes I might just do that!


One pocket bit that did work out well was an added inside pocket on the left side the coat where I can tuck my phone.  The seams lines are hidden inside the outer pocket.  Although I finished the seams so the coat could be reversible, I'm not certain I would wear it that way.  (This was my own modification - i.e. not in the pattern.)


I ended up with an inch of coat between where the collar ended and the top of the coat where the zipper would go.  (I'm still not sure if it was supposed to be this way or if I did something wrong.)  To address, I extended the seam binding (which I used instead of twill tape) all the way to the edge, top stitched and then sewed the folded over part down by hand.


I truly enjoyed the entire process of  making this coat, even the fiddly hand sewing.  The pattern is a really good one - i highly recommend it.   I'm even considering making a second one since I enjoyed it so much.

Besides the pattern, there are a couple of supplies I'd recommend (affiliate links):
  • Swedish Tracing Paper - it gave me easy visibility to the fabric underneath the pattern piece so I was able to line my flying geese points up right in the center.
  • Silicon pins - they are heat resistant and you can just iron right over them 
  • Binding clips - perfect for holding pieces of coat together for sewing
You can read the part 1 and part 2 posts for more tips and photos but wanted to list some keys recommendation here - both for you and for me if (WHEN!) I make a second one:
  • Trace and cut the pattern pieces onto the Swedish Tracing Paper  
  • Adding binding to pockets and consider making them larger
  • Use the walking foot to install the zipper
  • Install zipper after binding the coat center pieces
  • Don't bother to seam the bias tape for seam finishing since individual pieces cut are the right size.
  • Take it slow - don't try to do it all at once.  
  • If you aren't enjoying it, stop and come back to the step the next day.

Can't wait to wear the coat out in the wild!

Have a wonderful day! Patty

Friday, November 12, 2021

October Temperatures


North Carolina weather in spring and fall brings many perfect days - temps in the 70s and a deep Carolina blue sky.   This October brought us many of these days!

Temperatures definitely dropped as compared to September - the lows got lower and days that did reach the 80s (orange) didn't do so until late afternoon.  The second half of the month brought days in the 70s and a few in the 60s (green).  (The pool closed on October 3 and I'm tempted to embroidered a sad face on the block that represents that day.)


When I compare to October of 2020 (left in above photo), the number of days in each color seems about comparable with perhaps a few less highs in the 60s this year.


My design documents both the high and low temperature in a block which finishes 1 1/2 '' x 2''.  The improv strip is 1/4'' wide and records the low temperatures.  

Every month takes 2 columns - the 1 through 15 in first column and then 16 through end of month in the second column.  Filler blocks are added to square off the quilt.  The thin strips - 1/4'' wide - are randomly inserted and run 'vertically' for odd days and 'horizontally' for even days.

I'm using the exact same fabric that I did for my 2020 Temperature quilt.  The time I spent organizing is paying off - it takes no time at all to get the prep work done for sewing each block.  I made myself a mini-quilt to show off my temperature grid.  Oranges are 80s, yellows are 70s and sew on.  I've been asked several times what my fabrics are - I used all Painters Palette solids:
100+ is Sangria, 95+ is Real Red, 90+ is Poppy red, 85+ is Burnt Orange, 80+ is Tangerine, 75+ is Pencil Yellow, 70+ is Bright Yellow, 65+ is Apple Green, 60+ is Mint, 55+ is Bright Aqua, 50+ is Turquoise, 45+ is China Blue, 40+ is Lapis, 35+ is Purple, 30+ is Amethyst, and any temp is the 20s is Royalty.


I've written up my basic temperature quilt process in my tutorial including where I source the high and low information.  I'm looking forward to sharing the progress!  You can see my temperature quilts for 2018, 2019, and 2020!


Have a wonderful day! Patty