Showing posts with label tutorial. Show all posts

Tuesday, August 22, 2023

Covered Notebook Tutorial


One of my favorite thank you or birthday gift is to make a covered notebook. (Photo from November 2020.) They go together quickly and it is a nice way to use some fun fabric from your stash.

I use these moleskin notebooks - (affiliate link) you can get them with lines, blank pages or dots - and are available in several sizes. The 5" x 8 1/4" size was used for this project. In addition to the notebook, you'll need:
  • outer cover : fabric and fusible fleece ~ 9 1/2" x 12" (larger for dense quilting)
  • flaps: (2) fabrics 9 1/4" x 4"
  • lining: 9 1/4" x ~8"


Fuse fusible fleece to wrong side of outer fabric and quilt. (I did some simple straight line quilting). Trim quilted piece to be  9 1/4" tall x 11 3/4" wide.

Fold one edge of a flap ~ 1/4" and fold over again and top stitch. Repeat for second flap.

Place the notebook cover, right side up, on your cutting mat. Layer the flaps, right sides down, aligning the outer edges and making sure the top stitch edge is toward the center. Layer the lining on top, right side down. Sew 1/4" around the entire unit. (photo below, top row)
Clip corners and turn the cover inside out. (photo above, bottom row). 

Press. Top stitch around the entire edge of notebook .

Enjoy!


I sent this notebook off to Amanda who responded to my ask for scraps from Alison Glass fabric for my Summer Lovin' Seaglass SAL quilt. Thanks Amanda!


Have a wonderful day! Patty

Monday, July 10, 2023

Needle Minder Tutorial


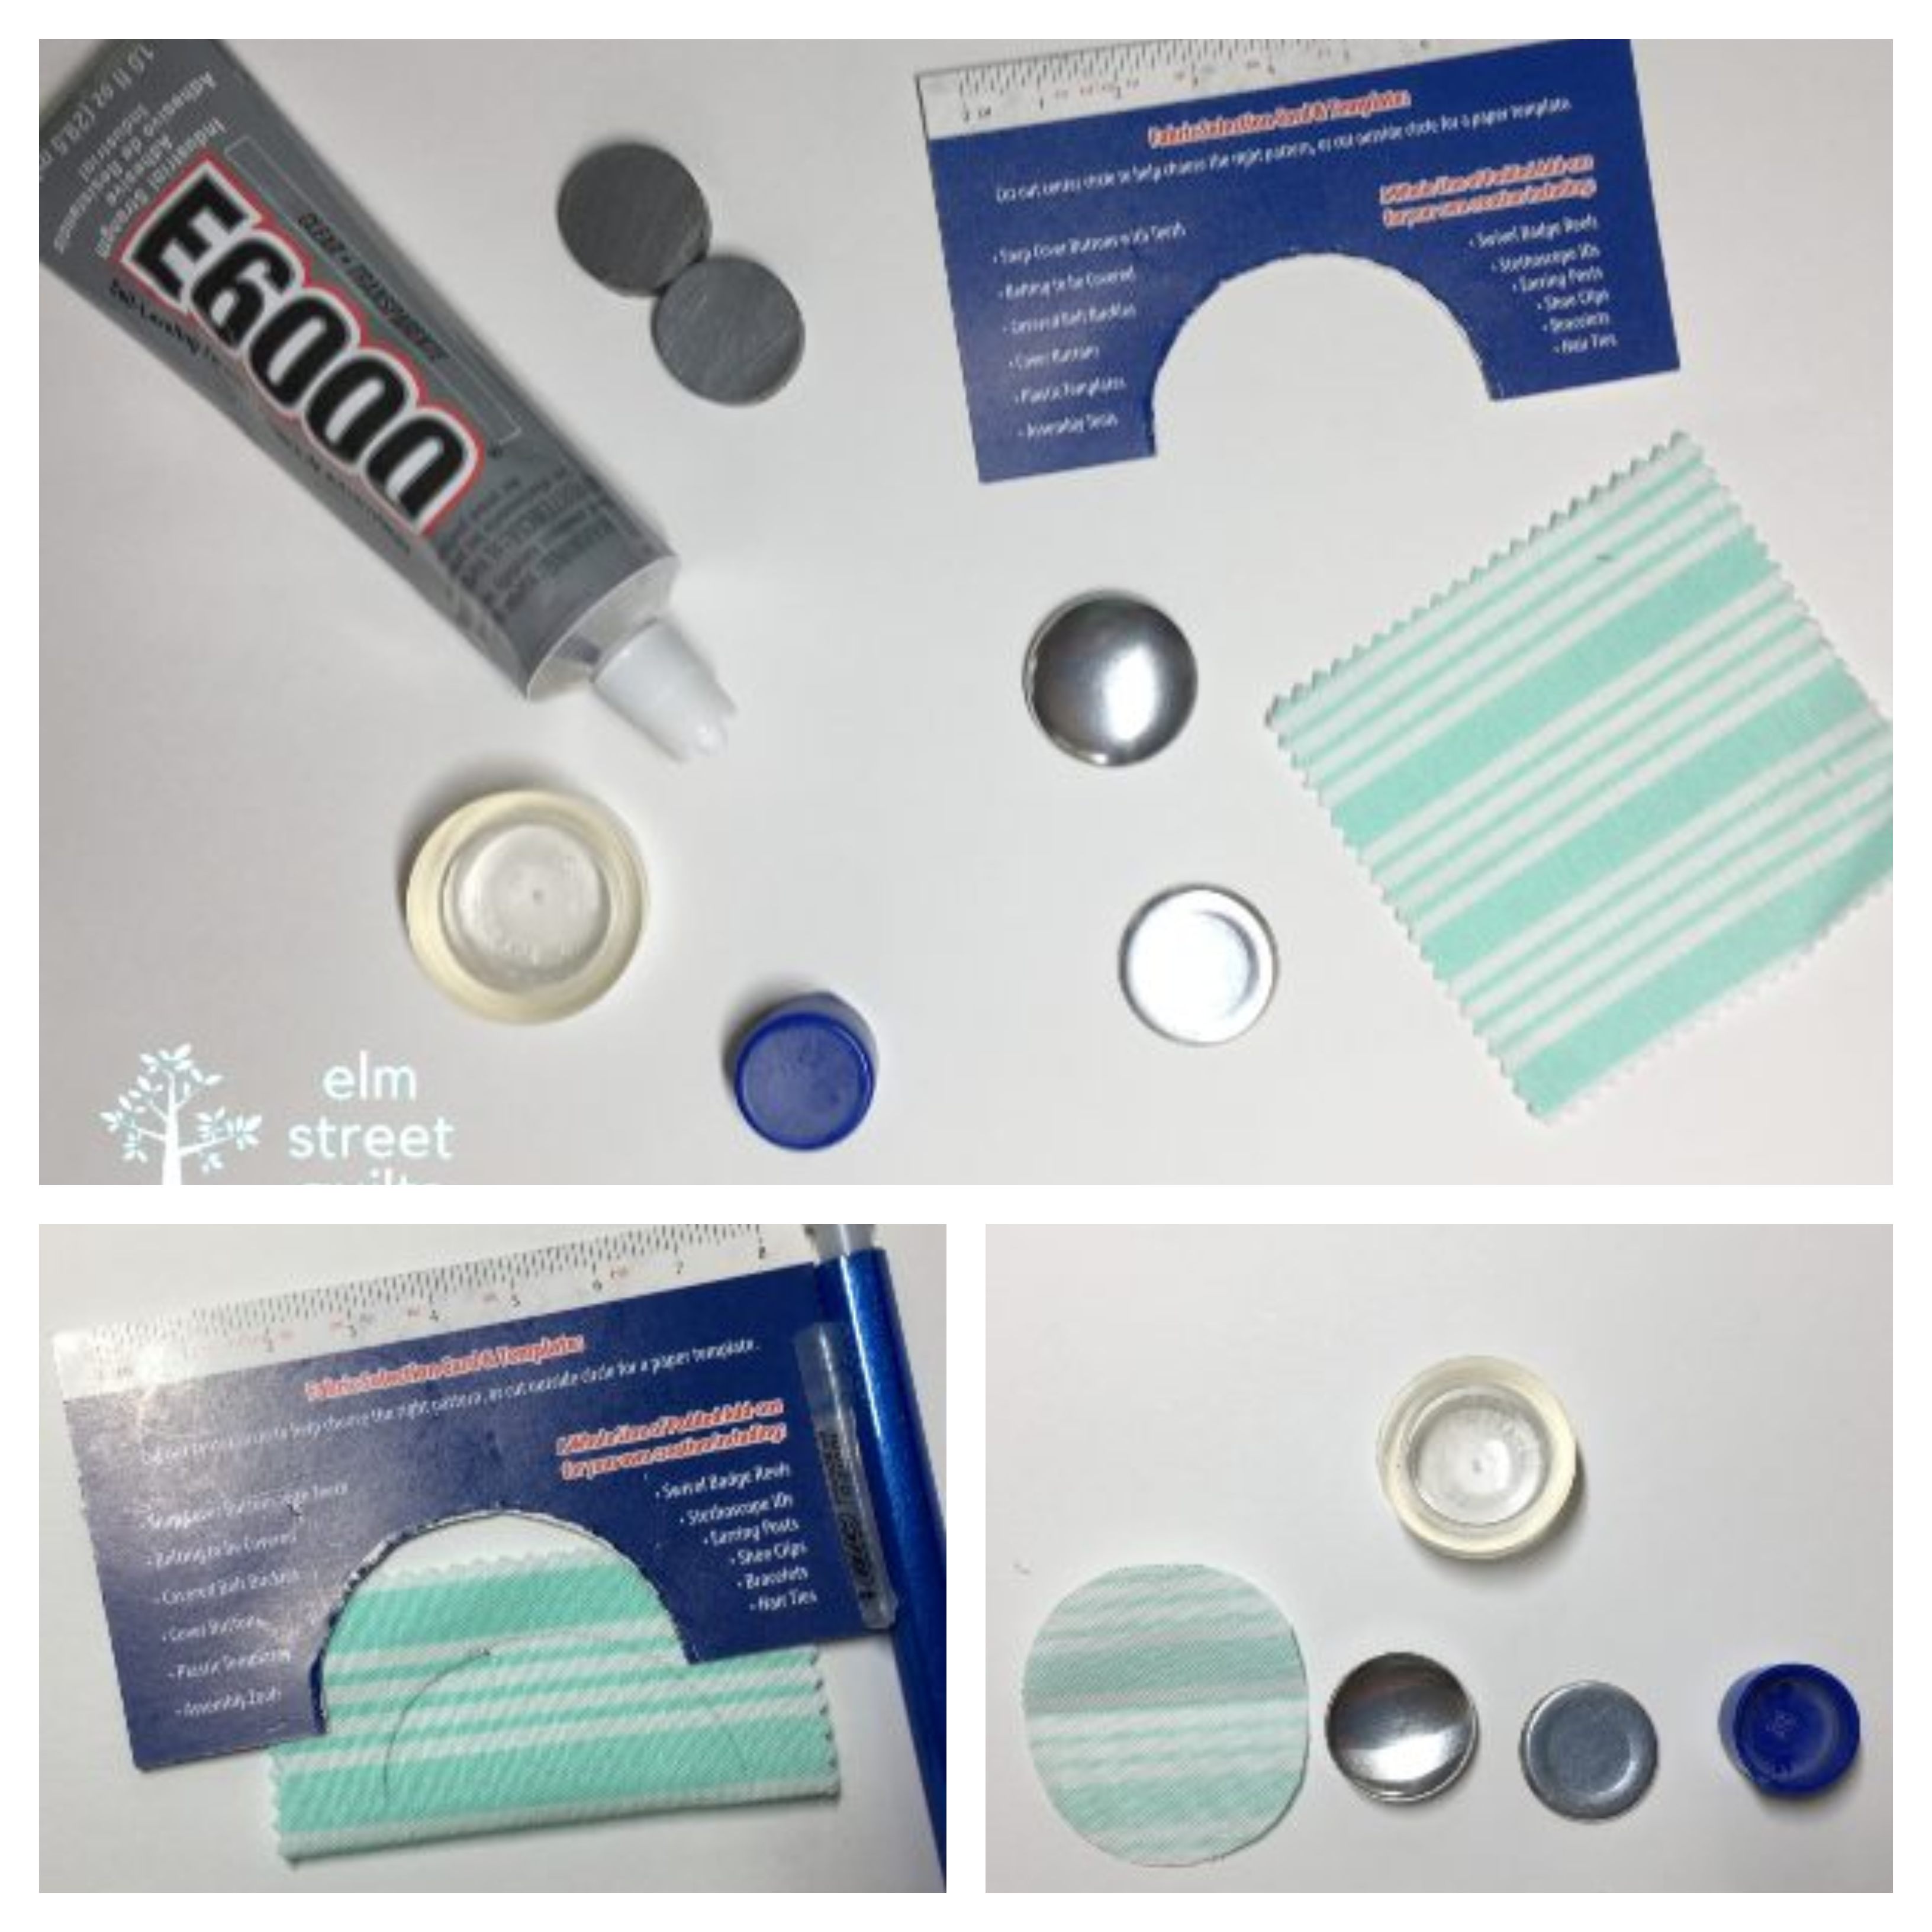
My greatest fear when stitching is that I will loose my needle and someone with sit or step on it. A friend gifted me with a small needle minder one day and I've managed to collect a few more over time. In an upcoming guild meeting, we are going to put some together so I put together this quick tutorial.

Supplies were all sourced from Amazon (affiliate links) and bought in bulk to support a guild meeting. Here is what you will need plus scraps of fabric:
  • Ceramic Magnets sized 18 mm x 5 mm - These come in all different numbers of magnets so you can get what you need. Just make sure you don't get the ones with the adhesive edge.

The button kit had a cardboard template which I place on a folded scrap and traced the half circle. To assemble the needle minder button part, you need your fabric, a button front, the flat back and the 'tool' - i.e. the round clear plastic cup and the smaller blue cup.
The actual assembly process is fun and quite satisfying! 

Center the fabric scrap right side facing down in the clear cup and place a button on top. Use the blue cup/plunger to push the button down. Wrap fabric and then tuck the button back over it. Use the blue cup/plunger to secure the back to the button and then pop it out!


Grab a magnet pair and spread adhesive on one side of one of the magnets. Gently push the blue cup/plunger into the back of the button. Let everything dry for 24 hours.


Now you have a new needle minder .. or maybe many more! ... ready for all your projects! Just put on magnet underneath your work and the rest of the needle minder on top and everything will stay nice and secure!


Have a wonderful day! Patty

Friday, January 14, 2022

Buffalo Plaid Quilt Tutorial


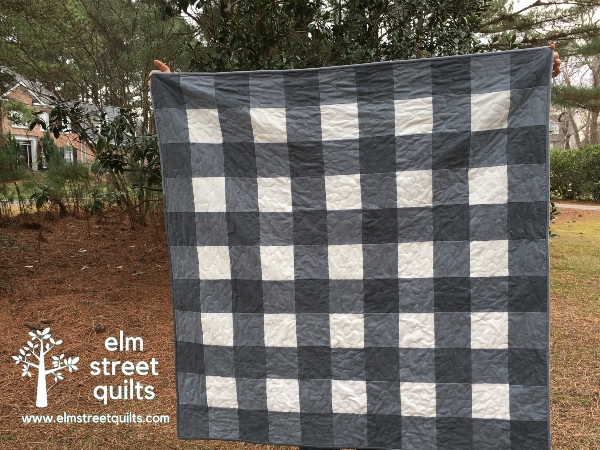
After seeing (and petting) some soft flannel in my LQS, I decided to make a simple quilt with nice easy squares and large meander quilting.  I'd always wanted to make a buffalo plaid quilt and in case you do too, you can find a brief tutorial below.  (I used the Yuletide Gatherings Flannel.)


My quilt finished at 55'' x 55''.  You can easily change the size of your quilt by adding or subtracting the rows and columns or even changing the size of the blocks.  The fabric requirements are for a quilt which finishes at 55" x 55".

Buffalo Plaid Quilt Tutorial

Fabric Requirements 

  • Dark Gray (DG) - 1 yard
  • Light Gray (LG) - 1.5 yards
  • White (W) - 0.75 yard
  • Binding - 0.5 yard (assumes binding cut at 2.25")
  • Backing - 3 yards

Cutting

Cut 5 1/2'' x WOF strips from each.  You will need 6 strips of the DG, 9 strips of the LG, and 4 strips of the W.  Each 5 1/2'' x WOF strip will yield seven (7) 5 1/2" x 5 1/2" squares.  Cut the required number as shown in table below.
Quilt Assembly

Assemble 6 rows of DG and LG squares.  Each row uses 6 DG and 5 LG.  Press seams towards the LG.


Assemble 5 rows of the LG and W squares.  Each row uses 6DG and 5W.  Press seams towards the LG.


Join rows together, alternating the DG/LG row with the LG/W row, ending with the DG/LG row.  Pin at each intersection to ensure seams stay nested.

Quilt and enjoy!  I used a basic large meander on my domestic machine.  It only used 2 bobbins and didn't take long to quilt!

If you make a buffalo plaid quilt using this tutorial, please let me know!

Pin for later:


Have a wonderful day! Patty

Monday, September 7, 2020

HST Diamond Baby Quilt (Tutorial)

Have a charm pack in your stash and a baby in your life?  Add in about a yard of background fabric and you'll have a fun quilt top!

There are a lot of fun layouts you can do with HSTs and after playing with a bunch of them, I really liked this one, inspired by a layout shared to me by my friend Kristin.


You will need:
  • A charm pack or at least 42 squares of fabric each 5'' x 5''
  • 1 yard of background fabric, cut into 42 squares each 5" x 5"
  • 1 1/4 yard of backing fabric
  • 1/3 yard of binding fabric
Pair each charm square with a background fabric square.  Draw a diagonal line and make two HSTs.  (Two-at-a-time HST TutorialMake a total of 84 HSTs.

Press and trim your HST all to the same size.  I was able to trim mine to 4 1/4'' but, sadly, not all charm squares are true to size so yours might only trim to 4''.  You will now have 84 HST.   (Note, the quilt only needs 81 so 3 of these are extra.)


Now the fun begins!   Sort your HSTs into 6 piles, keeping like colors together.   You will need:

  • 28 HSTs for the large diamond shape (shown in red)
  • 12 HSTs for the small diamond shape (show in light blue)
  • 15 HSTs for the lower right (show in gray)
  • 10 HSTs for the top right (shown in yellow)
  • 10 HSTs for the lower left (shown in dark blue)
  • 6 HSTs for the top left (shown in green)

 And remember, there will be 3 extra HSTs.


Once the HST are sorted, place the HSTs on your design wall (or floor), following the diagram.

Since it is very easy to twist placement as you carry your blocks from your design wall to your sewing machine, I recommend you assemble the quilt in quadrants.  For example, grab the 16 HSTs that make up the top left.  Then use a webbing technique (tutorial) to help keep everything in place.


Once each quadrant is complete, place it back on the design wall to ensure your pattern is correct and no HSTs were flipped.  Then get started on your next quadrant.

I often sew large quilts this way to avoid lots of long rows of blocks.


To enhance the design, I chose to quilt using my walking foot in a spiral pattern.  (See my spiral quilting tutorial.)  To start, I traced a large thread spool to give me a reasonably sized starting circle and then slowly and carefully started sewing.  

I adjusted the needle position and used the edge of my walking foot to keep things relatively consistent.  The lines of the spiral are about 1/2'' apart.

Once the walking foot quilting is all done, I switch to my FMQ foot and finish the spiral.  If you look carefully at the photo above, you'll notice the blue marking that shows where my FMQ foot was used.


I hope the tutorial was helpful! I've got some fall themed charm packs in my stash and am considering a lap top quilt with this pattern.

Thursday, August 6, 2020

Stacked Improv Curves Tutorial

I needed to make some improv curve blocks for my local MQG charity quilt.


These were a lot of fun to make so I put together a quick tutorial in case you want to give it a try.

First, cut 4 squares of fabric - mine were about 8" x 8".  Stack them in any order, aligning along two edges.  With your rotary cutter, carefully cut a freehand curve.  Un-stack and shuffle so that each piece is paired with one of a different color.

Fold each in half to find center.  Align the centers and pin.  Your concave piece should be on top.


One tip - use an old cutting mat when cutting curves to avoid damaging a good cutting mat!

From the center, carefully align fabric, working from center to each edge and pin the concave piece to to convex (pie shaped piece).  Sew seam.  For a different view of pinning for curves, check out Yvonne's tip post.


Note: when working with curves cut with a template, I typically only pin at center and each edge.  Freehand cut curves will not align on edges so you need more pins.

Press each of the four pieces and the stack again - aligning the bottom right corner.  Freehand cut another curve.  And repeat steps from above to align centers and pin from center to either edge.

You'll notice that this method is going to create some wonky pieces.  Wait until you've have sewn the final curves before trimming block.  To trim, use the outer edges of the original cut square to keep those edges on the straight of grain.


Note - Blocks were not trimmed to a predetermined size but only trimmed to square them up.

Play with different arrangements - you'll see two of them in the top row of photo below.  Once you find one that you like, sew them together, press.  Tim to square up the block.


I've been enjoying exploring curves using templates (see Carnival quilt) and now I think I may try some more improv curves!

Have a wonderful day! Patty

Monday, January 27, 2020

Left Right Geese Tutorial

Remember my Left Right quilt I shared last week?  The basic pattern is available for free from Fat Quarter Shop (get yours here!).   As drafted. the blocks have a plain rectangle surrounded by fabric strips.


I love the flying geese block so decided to include some inside my blocks - several people asked for the quilt math  and a brief tutorial so I decided to put one together!


The center of the block - the rectangle - finishes at 9 ½'' x 4 ½'' which means we need to make flying geese units that finish at 2 ¼'' x 4 ½''.


Here is what you will need:


  • 3 print rectangles, 2 ¾'' x 5'' (A)
  • 6 background squares, 2 ¾'' x 2 ¾ '' (B)
  • 1 background rectangle, 2''x 5'' (C)
  • 1 background rectangle,  1 ¾ x 5" (D)


On wrong side of piece B, draw a diagonal line.  Place B on A, sew, press and trim.  Repeat with second B unit.   Your flying geese unit will measure 2 ¾'' x 5''.  Make 3 in total.


Assemble block center following diagram.  I varied where pieces C and D were placed so that the geese were in different places in the block.   Block center will now measure 10'' x 5'' unfinished (which is, of course, is 9 ½'' x 4 ½'' finished.)

You could also cut two C pieces, sew them to either side of the 3 flying geese and then trim to block center measurements for lots of variety in geese placement.


Please tag me if you share a quilt with this center variation.  I'd love to see it!


Have a wonderful day! Patty

Monday, October 28, 2019

Tips for Burying Threads

Whenever possible, my goal is to start and end my quilting stitches off the edge of my quilt.  But sometimes bobbin thread runs out, thread color needs to change, or portions of your design do not need to be quilted.   The result?  You need to bury threads.

The process can look quite daunting but with the right tools, it is easy!


Let's get started!

As you are quilting, pull the bobbin thread to the front of your quilt - a seam ripper or a pin is all you need to grab that little loop of bobbin thread that pops up as you tug on the top thread.  Leaving bobbin thread on the back of your quilt is just asking for trouble with a big mess of thread!

Tie the two threads together twice to secure the thread.   Trim (if needed) so these threads are roughly 3'' long.

The self threading needle is essential for burying threads. The needle pictured below is from Clover and has a double eye.


There is a very, very thin slit in very top that you can snap your thread into.


 Push your needle part way into the same hole the bobbin thread come to the quilt front.  Push the needle tip about 1/2'' away, making sure you are running the needle through the batting and not  through the quilt back.  Pop your thread pair into the eye of the needle.  Pull through and remove needle.


I like to do each of these steps in batches - popping a whole series of thread pairs through before moving onto the next step.


Pulling slightly on the threads, carefully trim with curved tip scissors.  The curve tips help to protect your quilt top.


Great lighting and a quality lamp is critical.  I love, love my Daylight lamp.


I do my thread burying in bulk, sort of like chain piecing!  I will usually do 5 thread pairs at a time -  tying the 5 sets of knots and then bury the threads for all 5 before finally coming back and trimming off the excess thread.  The only exception is when I need to restart the line of quilting if the bobbin ran out (or a thread breaks.)  For those situations, I will bury and trim those threads before restarting my stitching.  In these cases, you may have to pull out some stitches in order to get thread tails long enough to actually tie.

The self threading needle really makes this process possible so invest in some before you give this a try.

Pin it for later:


Have a wonderful day! Patty

Thursday, September 26, 2019

Grow Your Pumpkin Patch


Pumpkins come in all shapes and sizes so your hand pieced pumpkins can too!    I'm making pumpkins in all different sizes and will (eventually) add sashing to the top so that they will all finish at the same height.


Referring back to the basic tutorial for hand piecing pumpkins, here is all you need to create some basic pumpkins in different sizes!


Except for the first pumpkin in the table, my pumpkins will finish at a constant width of 4''.   But, it's easy to create your own depending on the size of your scraps.

Once you've created your pumpkin patch pile of pumpkins, decide on whether you want to set them with sashing between them or just one next to the other.  So many possibilities!


Please share your pumpkins on Instagram. Let's use the #pumpkinqal

Have a wonderful day! Patty

Monday, September 23, 2019

Let's Hand Piece some Pumpkins (tutorial)

Pumpkin lattes, pumpkin bread, pumpkin flavored everything so why not hand-piece some fabric pumpkins?

I've got plenty of pumpkin 'flavored' scraps to work with.


Aren't my fabric pumpkins so cute?


Let's review basic pumpkin construction!  (Scroll for tutorials on hand-piecing.)

Make your pumpkins in whatever size matches your fancy (or your scraps).  Each pumpkin requires pumpkin fabric (a), stem fabric (b), 2 pieces background fabric (c), and 4 pieces background fabric (d).

Draw a diagonal line on each of the d background pieces.   Draw your stitching lines on the c background pieces.

Place each d unit on the corner of the a pumpkin unit and stitch.  (Remember all the hand piecing best practices including stopping and starting 1/4 '' from each corner.)

Trim away excess and finger press the pumpkin unit.

Sew c background units to each side of the stem.  Finger press.  Draw your stitching line and sew the stem unit to the pumpkin unit making sure you sew through and not over your seams.  (tutorial)


I'm going to make pumpkins in all different shapes and sizes.  Want to sew along with me?  You can make a runner, a wall hanging or just a mug rug.

My first set of pumpkins will finish in my quilt at 4'' x 6''.  To make your own pumpkin that size you'll need:


  • pumpkin fabric (a) - (1) rectangle, 4 ½'' x 5''
  • stem fabric (b) - (1) rectangle, 1½'' x 2''
  • background (c) - (2) rectangles, 2'' x 2''
  • background corners (d) - 4 squares, 1½'' x 1½''

I will be back later in the week with some more pumpkin measurements so you can make your very own patch.

Please share your pumpkins on Instagram. Let's use the #pumpkinqal

Some helpful tips:


Have a wonderful day! Patty