Monday, March 28, 2022

My Quilt Coat Pocket

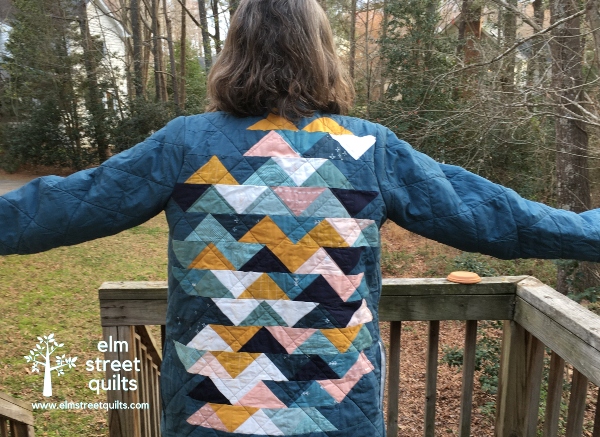
After my post last week on the completion of my second quilt coat, several people have asked for more information on how I created my pockets, a different version than  the Patchwork Chore Quilt Coat pattern calls for. 


Invaluable to the whole process of creating the coat and working on my pockets was using Swedish Tracing Paper.  For starters, it gave me easy visibility to the fabric underneath the pattern piece when cutting everything out.  For the pockets, it gave me the ability to test the pocket size before creating it in fabric.

Nothing fancy here!


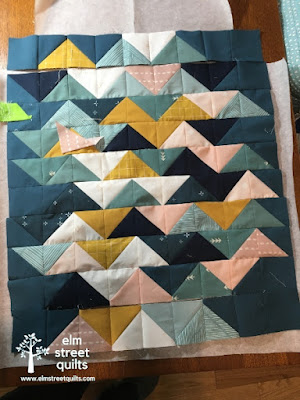
I used this tutorial to change the dimensions of my coat to add about 3" in length and reduced the width to accommodate the zipper.  After testing the pocket dimensions using the Swedish Tracing Paper, I created two quilted pockets that were 9 3/4" tall and as wide as the front coat panel.   

After quilting my pockets, I used a 6 1/2" drunkards path template to cut the curved edge. 2" bias binding was then applied.   The raw edges marked zipper and bottom will be covered by binding.  The raw edge marked side seam is sewn into the side seam.

I marked a line 9 1/4" from the bottom of the front panel (left image below).  Right sides together, align the top raw edge of pocket to the drawn line and sew 1/4''.  Back stitch at both edges.

Fold over pocket and make sure the side seam, bottom, and zipper sides all align with the raw edges of the front panel.  Baste in place.

Top stitching helps secure the pocket and contain the raw edges.  I choose not to top stitch across the binding.  Instead I took a few stitches above the pocket and along the binding.


You can see what the resulting seam looks like on the inside.


The pocket is 5" along the top edge, 3" on the side seam edge and roughly 9 1/4" from top of pocket to bottom of coat.

The rest of the coat assembled as per the pattern.  Different from the tutorial, I bind the zipper edges and then apply the zipper underneath.  (Using Wonder double sided tape helped me baste the zipper so the pockets lined up with each other.)


These pockets are a perfect addition to the coat.  They are aligned perfectly to tuck my hands into and are wide enough that my phone and car keys can rest comfortably inside.

Have a wonderful day! Patty

Friday, March 25, 2022

One Monthly Goal March Finish Link-up

Ready to link up your March finishes?
Don't panic - this link-up is open until March 31 at 11:55 pm ET.


Want to see everyone's goals for the month - check out the March goal page!

My goal for March was to make progress on my second Quilt Coat.  Read all about it here!


Now it's your turn to link up!  Please add a link to this OMG post so others can follow where you are linking.   Let's make that easy -  just paste this into your post:  

Thanks for linking up!

You are invited to the Inlinkz link party!

Click here to enter

Have a wonderful day! Patty

Wednesday, March 23, 2022

Spring Quilt Coat is Finished


I love my new Spring  Quilt Coat - my second quilt coat.  I finished the coat on March 19 and was able to wear it on my morning walk on the first day of Spring!!!

I used the same pattern for each of my coats - the first was made in a size large to accommodate layering .  I wore this first coat every day this winter and got many compliments.  You can read all about it here 


For my new coat, I went with a size small - this made me a bit nervous during construction but it all worked out at the end.   Besides adding binding, a zipper, and lots of hand sewing, I made a big change since sharing my initial progress in this first post.  Initially, I was going with inset pockets.  Initial construction steps went well but cleaning up the seams inside to get a nice finish turned into a hack job and I just wasn't happy.  So I ripped out hours of work and improvised a new pocket.  This allowed me to bring a bit of color onto the front of the coat.  The construction was very straightforward. 


I love my new pockets - they are just perfect to tuck my hands into.  Plus the color on the pockets and the pieced binding brings a bit of color to the front as well.

Critical to installation of the zipper was using Wonder double sided tape.  It held the zipper securely and didn't gum up the needle of my machine.  I stitched the zipper using my walking foot in the valley next to the binding.


I really love the primary color of the coat - this beautiful blue gray fabric and a sparkly Ruby Star Society fabric for the lining.  I made panels for each of the sections  - you can read more about my process on my first post.


I truly enjoyed the entire process of  making this coat except for the bit about removing my first attempt at the pockets.  I highly recommend the Patchwork Chore Quilt Coat pattern. 

Besides the pattern, there are a couple of supplies I'd recommend (affiliate links):
Will I make another one?  I just might but if I do, I will skip binding the seams and try zig zagging them.

Happy Spring!


Have a wonderful day! Patty

Monday, March 21, 2022

Sanity


Life is very crazy right now - has been for quite awhile.  And to add to the struggles of the world, I've had some family anxiety to deal with.

My piece Sanity is filled with big stitch quilting.  I spent a few minutes working on it each night and found peace in the motion of stitching and the texture left behind.


There is no quilting cotton in this piece.  There are scraps of my Dad's shirt (he passed away 2 1/2 years ago) plus scraps from a baby quilt and some linen and some chambray. 

My quilt Sanity is my entry to the latest Curated Quilts mini quilt challenge with the prompt of Utility. 

The challenge came with the directions to accessible fabrics for your Utilitarian mini quilt design. .... Accessible fabrics mean you may use the scraps you have on hand, significant fabrics that you treasure, or head out to the thrift shop for a few shirts to incorporate.

My quilt finishes at 11" square.


Have a wonderful day! Patty

Tuesday, March 15, 2022

HRT and HST BOM


Three blocks are now available for the 2022 version of the Modern HST BOM - block 1.  When the QAL started, you were told how many HSTs and HRTs you would need for the whole quilt and you could size them anyway you wanted to get the finish size that would work for you.  My blocks will finish at 8" which means my HST are 2". 

I made all my HSTs ahead of time but decided to make the HRTs as needed.  Depending on how they are sewn together, there might be ways to make the block differently and eliminate a seam.  So far, this is working for me especially since my fabric choices are limited.  Two of the blocks used HRTs joined together - I created a FPP pattern to create them without the intermediate step of needing 2 HRTs. ,

Check out all the blocks at #modernhstBOM2022.  While most of my quilts are made from my own designs, I always enjoy having a project where someone else tells me what to sew.  My only decision is the fabric!

Have a wonderful day! Patty

Friday, March 11, 2022

Quilt Coat - the Spring Time Version

When I made my first quilt coat - read all about it here - I wanted a coat I could wear everyday on my morning walk, big enough to add layers underneath it as the temperature required.


And wear it everyday I did!  As soon as I finished it, I knew that I wanted to make a second one. 


Instead of the gazillion flying geese I made for the first coat, I decided to just piece the back using leftover scraps from the first coat.  The layout I ended up with is different from where I thought I would end up but I am happy with it.

The rest of the coat will be solid color, this beautiful blue gray fabric and a sparkly Ruby Star Society fabric for the lining.  I made panels for each of the sections - the back panel (above photo), each sleeve and one for the front pieces.  I quilted using my walking foot in a diagonal grid, lines spaced 3" apart.


I modified the pattern to insert pockets into the seams instead of the top.  The first one involved a lot of nasty words and constant use of the seam ripper.  


I choose to make the pockets match the lining but wish I had made the pockets match the coat so they would be better hidden in the seam.  (But I don't wish it enough to start over!)

My first coat was a large size and I decided to make this one in a small size for a 'sleeker' fit without leaving room for layers.  As I'm still working through construction, this has felt like a risk every step of the way but my first coat has lots of extra room so I am feeling confident.  (Fingers crossed.)  With the sleeves basted in, I think it will be ok.


After finishing the only basted sleeves, I need to make a collar , lots of hand stitching to finish off the seams, add binding and then a zipper.   Hope its done before summer arrives!

Have a wonderful day! Patty

Tuesday, March 8, 2022

Peace and Sunflowers


Peace and sunflowers.

The sunflower block is available from Kristy at Quiet Play for free with a donation to a charity that can support the people of Ukraine.  You can find it here in Kristy's shop.  The inner part of the sunflower can actually be pieced to add interest but I decided to go with this black print and just pieced it as unit.


The Peace for Ukraine block is from Berene at Happy Sew Lucky is also available for free with a donation to a charity that supports the people of Ukraine.  You can find it here on Berene's blog.


There are likely others offering other blocks with an associated donation.  If you know of one, please comment below so others can find.

It's hard for me to truly understand what the people of Ukraine are going through right now.  The reports of the humanitarian crisis is horrifying, difficult to watch, and frankly hard to comprehend.  

I chose to donate to Unicef for Ukraine and will hang both these blocks in my sewing space.

Have a wonderful day! Patty

Tuesday, March 1, 2022

March One Monthly Goal

Welcome to March!


New to One Monthly Goal?  Welcome!  To join, share a photo of your project plus, some words about what you want to accomplish in a blog post, an Instagram post (tutorial) or a post on Flickr and add that photo to the link-up.  Return at the end of the month and share your results.  (Results link-up opens for the last 7 days of the month.)

My goal for March is to make progress on Quilt Coat #2.   My first quilt coat was purposely made in the large size so I could layer underneath it during the chilly mornings.   This coat is for Spring and will be in a smaller size.  Spring is a short season in NC so my goal for March is to make a lot of progress on the coat - the back panel is pictured below.


Now it is your turn to link up - what is your goal for this month?   The One Monthly Goal accomplishment linkup will be available on March 25.  Make sure you add a link to this OMG post so others can find the OMG link-up from your blog.  Let's make that easy -  just paste this into your post:  

Take a few minutes to visit others and make new friends!

You are invited to the Inlinkz link party!

Click here to enter


Have a wonderful day! Patty