

My daughter wanted a a small cross-body messenger bag that she could use to carry her larger headphones, phone and wallet.
This is a simple messenger bag tutorial that you can enhance with pockets or perhaps enlarge. My daughter is barely 5' tall so the instructions for the strap allow you to adjust to the size you need for your special person. I would not recommend this tutorial for a beginner as the construction involves multiple steps and assumes some knowledge of bag construction.
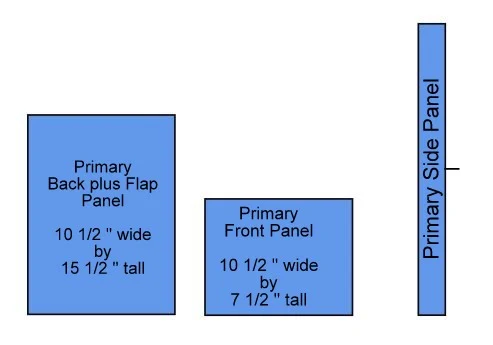
The Messenger Bag finishes 10'' wide, 8'' high and 1 1/2 '' wide. See below for fabric credits.
Supplies you will need - (supply source information)
#
pieces
|
Dimensions
(height x width)
|
|
Primary fabric
|
One (1) of each size
|
15 ½ x 10 ½ ‘’ (back plus flap panel)
7 ½ x 10 ½ ‘’ (front panel)
24 x 2 ‘’ * (side panel)
* - can be pieced
|
Lining fabric
|
One (1) of each size
|
8 ½ x 10 ½ ‘’ (flap panel)
7½ x 10 ½ ‘’ (back panel)
7 ½ x 10 ½’’ (front panel)
24
x 2 ‘’ * (side
panel)
* -
can be pieced
|
Stabilizer
|
One (1) of each size
|
15 ½ x 10 ½ ‘’ (back plus flap panel)
7 ½ x 10 ½ ‘’ (front panel)
24 x 2 ‘’ * (side panel)
|
Magnetic snaps
|
One set
|
18 mm
|
Fusible fleece
(for magnetic snaps)
|
Two (2)
|
10 x 2 ‘’
|
Prepare outer bag
The bag is constructed from three pieces - the back panel (includes fold-over flap), the front panel, and the side panel.
Place the primary fabric for the back plus flap panel onto the same sized piece of the stabilizer. Quilt straight lines across to secure. For my sample, I choose to place a few well spaced quilting lines.


The bottom edges of front panel and all four (4) corners of back panel including fold-over flap will need to be rounded.
Using a small bowl and trace around edge of bowl to round off edge.

To make sure these were all sized the same, I traced the bowl on one (1) corner, cut out that corner and then used this as a template for the other five (5) corners.
Prepare lining
Assemble (if necessary) side panel from lining fabric to construct a lining side piece 24 x 2''.
The lining construction uses an additional piece of fabric - the lining flap panel, the lining back panel, the lining front panel and the lining side panel.

 As for outer bag, round the corners using that same small bowl or the template you created.
You will need to round off:
- the bottom two (2) corners of the front lining panel
- the two (2) top corners of the lining flap panel.
- the two (2) bottom corners of the lining back panel.
Iron two (2) strips of fusible fleece across wrong side at top of lining flap panel, leaving a 1/2 '' gap from edge. Secure with lines of straight stitching across. (The magnetic snap will be installed here in next step.)

Install Magnetic Snaps
This tutorial on magnetic snap installation provides step by step instructions with photos on installing magnetic snaps.
Install magnetic snap on primary front panel for outer bag. On right side, place a mark 2 ½ '' from bottom and 5 ¼'' from each side. Center magnetic snap over this spot and install. (Note - I installed this snap once bag was assembled so it isn't shown in photographs.)
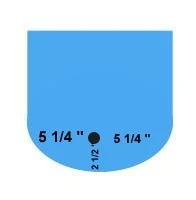 |
| Primary Front Panel |
Install magnetic snap on lining flap panel. On right side, place a mark on right side 5 ¼ '' from each side and 1'' from side with rounded edge.
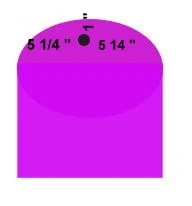 |
| Lining Flap Panel |
Assemble Outer Bag
Mark center of bottom of primary back (plus flap) panel and mark the center of primary side strip. Align center markings and pin carefully around bag. Sew using ¼'' seam.
Repeat process to attach primary front panel to primary side strip. (Note if needed, trim excess side panel fabric so that it aligns with top edge of primary front panel.)
 |
| Add caption |
Turn right side out. (Note, magnetic snap should have been installed before outer bag was assembled. It should be located roughly where the letter 'E' in 'Elm' is located.)

Complete Bag
Right sides together pin the lining flap to the bag flap. Sew around edge stopping and back-stitching at bag edge There should be approximately an inch of extra fabric which will not be attached.

Turn flap right side out. Tuck extra fabric inside bag.

Sew one end of bag strap to right side of bag side. (I used contrasting thread for the tutorial photo - please use thread that will blend better.)

Pin other end of strap to bag and audition strap length to best fit height of user. When correct length is determined, sew second side of strap, being careful not to twist.

Right sides together, tuck outer bag inside the lining bag along front edge. Make sure strap is tucked between the outer bag and the lining bag. (Although photo shows pins, binding clips would be a better choice to secure.)

Take to your machine and sew from back seam of side panel, across side panel, across front panel, across other side panel. You do not sew the back panel.
It will take a bit of maneuvering around your machine but take it slow and all will be fine!

Turn right sides out. Around flap edge and front bag edge, secure with binding clips.

Sew a line of top-stitching around edge. You'll need to move slowly and just move the bag and you go. I was able to do this without any issue.

Tuck flap lining behind back lining piece. Fold over edge of back lining piece by ¼ '' and close opening with small stitches by hand.

Enjoy your bag!

The fabric is Clothworks Cherry Mint and was gifted to me by the designer Reika Hunt. I used a dark print for the outside and a white and blue print for the lining.


Have a wonderful day! Patty
Fantastic - I'm going to try this one. Great fabric😍
ReplyDeleteVery pretty, very useful.
ReplyDeleteAwesome tutorial!
ReplyDeleteVery nice! Thanks for linking up to Finished or Not Friday.
ReplyDelete