Sunday, August 23, 2015

Block 101 - Flying Geese

Flying geese are my probably my favorite block to make.  There is something almost magical about how this block is made using the 4 at a time method often called the 'no waste method'.

To make a set of 4 geese, you'll need one large square and four small squares.  Draw a diagonal line on the wrong side of each of the four small squares.
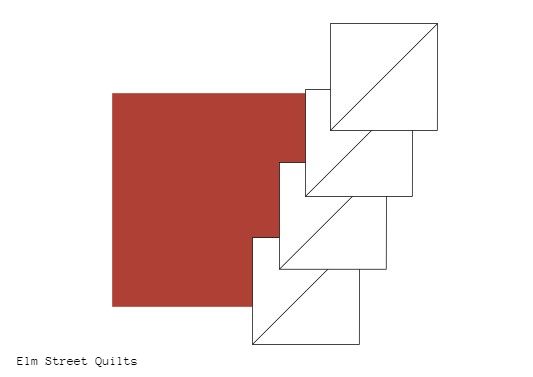

Pin 2 of the small squares onto the larger square, right sides together and lining up your diagonal lines. Sew a scant ¼'' to either side of the drawn line.
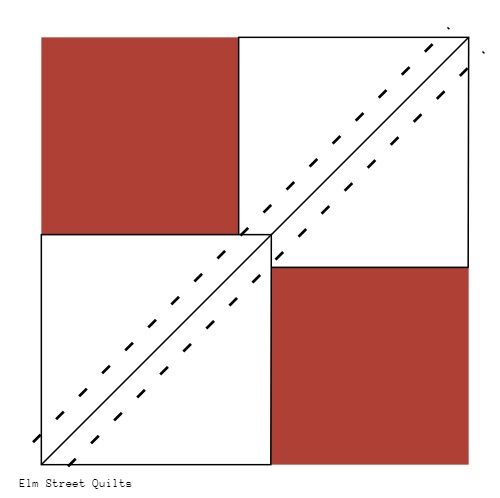
 Cut apart  and finger press seams open.


To each unit, pin a small square, right sides together, lining up the diagonal line to the corner and sew a scant ¼'' to one side of the drawn line.   Cut apart and press seam open.


Tada!  You just made 4 lovely magical flying geese.


You need to trim carefully to get to the desired size.  Any ruler would work - my favorite is the Wing Clipper (affiliate link) - and the key is to make sure the tip of the geese is centered and that there is a generous ¼'' between the tip and the edge so that you won't lose the tip when you sew them together.

You can make geese in all sizes and the formula for creating geese any size you want is easy.  Start with any finish size you want - the height and the width.  The height will be half the size of the width.

For the primary color (red) add 1½" to the width (W) you want and cut a square at that size.   For the secondary color (white) add 1'' to the height (H) and cut 4 squares at that size.   

Confused?  Try the table or let's do some math:

You need a flying geese unit which will finish in your quilt at 4'' tall and 8'' wide (4 x 8")?  You'll need to cut a square at 9½'' (width of 8'' plus 1½'') of the primary color.  You'll need to cut 4 squares of the secondary color at 5'' (height of 4'' plus 1'').


Now start creating your very own flock!

Have a wonderful day! Patty

Monday, August 17, 2015

Harvest Quilt a Long


I love summer.  It is my favorite season - the beach, swimming laps at the pool and the long hours of daylight.

But there is something about fall that really sparks my quilting juices.

I am very excited to announce my very first Quilt along to make this Harvest wall hanging.


The wall hanging will finish at 31 x 31" and gives you the chance to play with all the lovely browns, golds and orange fabric in your stash.

Along the way, we'll make some favorite blocks including flying geese and churn dash blocks.

The specific fabric requirements will be posted next week and then the blocks will be posted in pairs throughout September.


You can find the schedule here.

Will you come play along?  It will be great fun!  Leave me a comment if you are going to sew along!


Have a wonderful day! Patty

Wednesday, August 5, 2015

Diamonds (tutorial)


Diamonds are a girl's best friend - even when they are not the shiny, precious kind!

This mini quilt measures 9 1/2" square and can be put together quickly.

You'll need the following materials:

  • 18 squares of fabric, each 2 1/2"
  • 18 square of background fabric, each 2 1/2"
  • 12" square of backing material
  • 12" square of batting
  • 1 strip WOF (width of fabric) for binding.  I cut mine at 1 1/2" for a thin binding
To assemble:
  • Create 18 half-square triangles (HST) following the instructions here.  Press and trim each to 2".
  • Create 9 blocks - each block will use two sets of HST.  To assemble blocks, lay 2 sets of contrasting HST as shown in photo.
  • Sew top row and bottom row together.  Leave blocks connected (see that chain of thread?).  
  •  Press.

  • Sew top and bottom together.  Press.

  • Assemble your 9 blocks in a pleasing arrangement and assemble rows.
Your mini quilt top will now measure 9 1/2" square.  Press.

Quilt as desired.  For this sample, I did dense straight line quilting.  My first step was to stabilize the piece by sewing the a straight line through the centers of the blocks and then sewing around the edge of the entire piece.

The binding was cut at 1 1/2" and sewed on at something less than 1/4" to avoid loosing too much of the diamond points.


This quilt was also published on my blog A Stitch in Time.

Have a wonderful day! Patty