Pages

Friday, November 30, 2018

Scrappy Celebration


Elm Street Quilts HRT

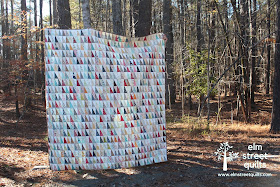
My HRT (half-rectangle triangle) scrappy celebration quilt is done!  The quilt measures 72 x 80'' and is composed of 720 HRT blocks all made from Moda Sweetwater fabric scraps and charm packs.


The whole process of assembling the quilt and the FMQing was made more enjoyable when I would rediscover favorite prints.  I love those polka dots!


The quilt was quilted on my domestic machine in a simple meander.  I had 4 yards of the blue fabric in my stash for the backing.


Want to make one of your own?  Check out my tutorial for the half-rectangle triangle block!


I'll be linking up at Brag about Your Beauties Freemotion by the River,   WIP Wednesday's,  Let's Bee SocialMidweek Makers.  Needle and Thread Thursdays, Finish it Up Friday and Finished or Not Friday.


Have a wonderful day! Patty

Thursday, November 29, 2018

Crown of Thorns


Have you been following along with the Friendship Album 1933 podcast from Quilt Fiction?  

Friendship Album 1933 is a novel written by Frances O'Roark Dowell and shared each week - chapter by chapter - as a podcast read by the author.  The novel brings us into the lives of each of five women - Eula, Dorothy, Bess, Emmeline and Florence.  These women meet weekly in a quilting circle as they each work on a quilt to enter into the Sears National Quilt Contest as part of the World's Fair in 1933.

Each chapter of the novel is released as an podcast each Friday - if you are not already actively listening, you can get started here!  It is a perfect listening for your sewing.

In celebration of her novel, Frances and I have been collaborating on patterns for the quilts featured in the novel.  A few months ago Frances shared a free pattern for a Double-Windmill Quilt.

Today, we are sharing a collaboration for base instructions for a quilt made with the Crown of Thorns block. The Crown of Thorns block is constructed from half-square triangles (HST tutorial).


You can easily make your block bigger (or smaller) by changing the size of the HSTs you make.  2'' (finished) HST to make a 10'' (finished) block; 3" (finished) HST would make a 15'' (finished) block and so on.

Set with or without sashing in a traditional grid would make a beautiful quilt. I really love the secondary pattern in the quilt set without sashing.


Setting the blocks on point is the setting that Frances choose and added in a beautiful sawtooth border!


One of the trickiest parts of a on point setting is calculating the dimensions for your setting and end triangles.   I found a great resource that already figured out the math based on the block size you choose - find it here.

Frances has channeled her inner-Dorothy and made a beautiful quilt.  Jump over to Quilt Fiction to see her quilt and the base instructions to design one of your very own.  We haven't quite put together a pattern but if there is interest in one, let us know!


Have a wonderful day! Patty

Monday, November 26, 2018

Hand Pieced QAL : Dealing with Seam Allowances


Have you been practicing marking seams (tutorial) and doing the running stitch (tutorial) and now wondering what to do with your pile of 2-patch units?

Let's join them together into blocks and learn  how to deal with the seam allowances.


You will nest your seams exactly as you would if machine piecing.   But with hand piecing, you will sew through your seam allowances - not over them!

Sew right up to the seam allowance, do a backstitch and then push your needle through the seam allowance of the block on top.  Then, do another backstitch.


That's all there is to it!  Your seam allowances will be free (and happy).

Kristin has put together an awesome video that explains everything - check it out!

Any questions?  Leave me a comment - I'll be happy to help!


For more information on the QAL including catching up with any tutorials you've missed, please visit the main event page - Hand Pieced QAL.   

You can also join our Hand Pieced Quilt Along Facebook Group and / or subscribe to our newsletter so you'll be among the first to know about new block tutorials.


Have a wonderful day! Patty

Saturday, November 24, 2018

One Monthly Goal - November Finish Link-up

Ready to link up your November finishes?
Don't panic - this link-up is open until November 30 at 11:55 pm ET.


My goal for November was to quilt a challenge quilt.  I'm not quite ready for the reveal photo yet but the quilt is quilted and faced.  Here is a peak at a bit of the quilting and the faced edge.


There will be three winners this month - Fat Quarter Shop is offering a $25 gift certificate, Make Modern Magazine is offering a 6 month subscription to their digital magazine and Michelle Wilkie from Factotum of the Arts is offering a pdf version of her Phased Circles pattern.


Visit the One Monthly Goal event page for the specific requirements for links and social tags. 

And remember, to be eligible for the prize(s) by random drawing you must linkup at both the goal setting and the accomplishment linkup in a given month. (
November Goal Setting Link-up.)

Make sure you add a link to this OMG post so others can follow where you are linking.   Let's make that easy -  just paste this into your post:  


Sign up to receive email notifications when the One Monthly Goal linkup is open.  Think of it as a helpful reminder!  Joining the link-up from Instagram -see the tutorial.

Congratulations to Tracie, Cynthia & Ioleen - our randomly chosen winners for November!  They have been notified by email - updated Dec 2.


Have a wonderful day! Patty

Wednesday, November 21, 2018

Thank you!


Thank you so much for being such an awesome part of my quilting family.  I enjoy sharing my quilting adventures on the blog and am thankful for all the friends I have made in the quilting internet.  I truly appreciate your wonderful comments and encouragement and love seeing what you are making as part of One Monthly Goal.

For those in the US, have a wonderful Thanksgiving!  Enjoy time with family and friends (and tuck a bit of hand-stitching into your bag!)


Have a wonderful day! Patty

Friday, November 16, 2018

Quilters Planner November block update


I've been enjoying making one 6'' block each month from the Quilter's Planner QAL.  This November block is one of my favorites especially because all those ovals are going the same way!

Eleven done, one more to go!


I'm still thinking about making these into a pillow - 9 blocks on the front and 3 on the back.  Making couch pillows is a lot of fun!

I just received my Quilter's Planner for 2019 from Fat Quarter Shop.  The new year will be here before we know it!

Have a wonderful day! Patty

Wednesday, November 14, 2018

Eco-dyeing

In October, my guild had a workshop on dyeing fabric with natural items.


The fabric had been pre-treated with a mordant and we dipped each piece of fabric into iron water to lightly dampen before placing our leaves and flowers on the fabric.  The instructor - Erin Miller - brought all kinds of samples.

I didn't roll mine until I got home (I was too busy helping with the meeting) which I was able to add rose petals and geranium leaves to the mix.

The BEFORE shot
After putting the rolled up fabric into my vegetable steamer for 90 minutes, I kept it in a plastic bag for about 24 hours.

Probably what surprised me the most was the purple spots from the roses.  And the fact that those golden rod stems and flower added a lot of yellow.


Isn't this interesting?


I rinsed out the fabric, pressed it and hung it up on my design board for some inspiration.  I want to do something special!

It was so much fun to try something new, especially since it did not involve any harsh chemicals!

Have a wonderful day! Patty

Monday, November 12, 2018

Hand Pieced QAL - The Running Stitch Tutorial


We've covered the basics of marking stitching lines - see my post and Kristin's post.  The most important thing to remember is to mark your stitching line such that it starts and ends 1/4'' from each edge.

With stitching lines marked, let's cover the basics:  the knot, the running stitch, and the back-stitch.  My post will cover this in photos and Kristin has published a wonderful video.

The Knot

We will be stitching with double strand thread in this tutorial.  You could also work with a single strand of thread.  (Note - please use a neutral color for your thread.  I've chosen black for better photos.)

Thread your needle with thread (50 wt or 80 wt) which is the length of your arm from elbow to finger tips .  (Anything longer is just going to tangle.)

A simple knot is all you need - just make a loop at the end and pull through the thread tails.  There are several other types of knots you could use as Kristen demonstrates her video.


At the end of stitching, I typically pull my needle under the last stitch, make a loop and make a knot.


The Running Stitch

The basic running stitch is a line of small even stitches that run through your fabric without overlapping.  To make a running stitch, push your needle from the front of your work and right back up to catch just a small about of fabric.  Start right at the mark you made - 1/4'' from the edge. (See tutorial for marking stitching lines.)


Continue taking one stitch at a time, working to get your stitches even.  You can also pick up several stitches on your needle by rocking the needle in and out and using your left hand to push the fabric onto the needle.


You should try for 5 - 6 stitches per inch.  With practice, your stitches will become reasonably uniform in size.


The Back-Stitch

The Back-Stitch is a very important stitch for hand piecing.  A back-stitch should be added:

  • at the beginning and end of a line of stitches to help secure the thread
  • right before and right after sewing through a seam allowance (tutorial on this coming soon!)
  • every 5-6 stitches to help keep proper tension  

A running stitch moves forward across your stitching line.  A back-stitch goes backwards!  (I bet you figured that out!)

Start by making a single running stitch.  Then, bring your needle back down through that first initial hole (or something right next to it) and then back up again as if you are making another running stitch.


And remember, back-stitching every 5-6 stitches in key for maintaining proper tension.


If you've never done a running stitch before, give it a try.

Don't forget to take a look at the wonderful video Kristin from Simple Handmade Everyday made on the running stitch.


For more information on the QAL including catching up with any tutorials you've missed, please visit the main event page - Hand Pieced QAL.  

You can also join our Hand Pieced Quilt Along Facebook Group and / or subscribe to our newsletter so you'll be among the first to know about new block tutorials.


Have a wonderful day! Patty
Friday, November 9, 2018

Tutorial - How to make a Temperature Quilt

Creating a temperature quilt for 2018 has been a lot of fun.  Checking the high temperature at the end of each evening and sometimes cheering for things to warm up just a little bit (or not) in order to make the quilt more interesting!

I am definitely making a temperature quilt for 2019.  Want to make one too?  Here's my hints and tips to get your started on your design plus a great source for your weather information.


Design Choices - The Block
  • Highs only or highs and lows?  A quilt in which you record only the high temperature is easier (read quicker) to assemble and to prep.  A quilt in which you record high and lows, however, would likely make a more interesting final design.
  • Hexies are an obvious choice for just recording high temperatures (like my quilt top) especially since the hexies can all be prepared ahead of time 
  • Flying geese or half square triangles are nice choices for a high / low.  Use the 'geese' part for the highs and the smaller triangles for the low temperatures. 


Design Choices - The Layout
  • Once you've decided on the "shape", time to break out the graph paper and decide on how to assemble.  My hexie quilt uses two columns for each month which will give me a finished size approximately 38 x 32'' when complete.
  • Another example - perhaps the simplest -  uses a rectangle and assemble each week into a row.  A quilt which uses fabric strips which are 5 x 1 '' (finished size) would be 35 x 52'' (finished).

You can find more examples on my Pinterest board.


Decide on your temperature scale and fabrics

Example Range
  • Study the average temperatures for your area.  Do you get some highs in the 20s in the winter and then hit the 90s in the summer?  You may want to consider a range of every 5 degrees.  Live in an area where the temperature is less diverse?  Perhaps you want a range of every 3 degrees.
  • Raid your stash and start laying out the fabric in gradient, mapped to color ranges.  I tried to stay in the same color family (ex - two shades of orange for the 80s) but you can really do whatever you want.   Before you cut any fabric, leave your fabric gradient on a table or design wall for a few days and make sure you are happy with it.  Better yet, ask a friend what they think.  Rearrange if you need to!
  • Once you have a final color mapping, sew together your weather rainbow. Mark the range on the fabric - since I used hexies, I marked on the paper piece.
A good range for North Carolina

Mother Nature becomes the ultimate designer of your quilt.  You choose the layout, the color range but the placement is a daily surprise!

Use a consistent data source

  • Decide how you will get your data for your quilt.  You can read your own thermometer at the same time every day or use a source like Weather Underground.  (There is a lot of historical data there so you could go back and make a quilt for a specific year, and not just the current year.)


Keep current!
  • Keep the project very accessible so you won't forgot to work on it every day.  Do you watch tv every night?  Choose an option that you can work by hand (like hexies) and store it in a basket next to your favorite chair.
  • If you sew at your machine every day, get into the habit of adding to your temperature quilt the first thing as you sit down at your machine or perhaps as a leader / ender project.
  • Pre-making (or at least pre-cutting) your units will make it easier to just add one unit each night. Hexies are so very portable so I can bring a stack of fabric squares in my travel bag and get the hexies made ahead of time.
  • If you do get behind - it happens! - give yourself a very specific goal on how you will get yourself caught up.  For example, away for a week and got 10 days behind?  Give yourself a goal of 4 a night until you get all caught up.


For 2019, I've narrowed my design down to two choices.  First, I plan to hand piece, adding each day's block before I pick up my book at the end of the night.

I may do a high/low quilt using a rectangle with a stitch & flip corner.  Changing the orientation of where the stitch & flip corner appears in the block would make it fun and interesting.

If I decide on a high temperature only quilt, I will likely do something like a geese shape as shown below.
Have you ever made a temperature quilt?  Are you considering one for 2019?  Leave a comment so we can all see!


Have a wonderful day! Patty

Wednesday, November 7, 2018

October Temperatures


After months of solid orange (i.e. temperatures in the 90s) plus lots of red (temperatures in the 90s), October brought some cooling temperatures.  Hurricane Michael blowing through brought cooler air with it and it is clearly here to stay!  The second half of the month had high temperatures in the 40s and 50s with a few days in the 70s.


The first column (of color) on the left is January 1 through 15, next column January 16 through 31 etc which means the last column on the right is October 16 - 31.  I'm using a low volume fabric to fill in months that don't have 31 days plus surrounding the overall temperature quilt.

I did get myself a little twisted up this month (again!) when I forgot to add a hexie for the 16th after catching up following time away from home. That meant ripping out and reattaching a whole bunch of hexies!

The quilt measures roughly 32'' x 34''.   Here is the mapping of color to temperature range - 


I'll be linking my quilt up to a temperature quilt link-up plus I'll be linking up at Brag about Your Beauties Freemotion by the River,   WIP Wednesday's,  Let's Bee SocialMidweek Makers.  Needle and Thread Thursdays, Finish it Up Friday and Finished or Not Friday.

Have a wonderful day! Patty

Monday, November 5, 2018

Hand Pieced QAL - Marking Stitching Lines

(Click here for November One Monthly Goal Link-up)


(Read more about the Hand Pieced QAL announcement which will start in January.  Want to make sure you don't miss it?  Join our Hand Pieced Quilt Along Facebook Group.  We'll remind you of new posts as they go live and you can share photos and chat about your experiences as we all build this quilt together.  Subscribe to our newsletter so you'll be among the first to know about the latest QAL news.)


Are you getting excited for our Hand Piecing QAL which starts in January?  Kristin and I are busy finishing our quilts for the big reveal and we thought it might be helpful to share a bit about the process.

Today we are talking about how we prepare our units for hand piecing.

First, I use a rotary cutter and mat just as I would to cut blocks to sew on my sewing machine.  Pieces are generally* cut to the specific size needed - no two at a time construction methods here.  (* Some of my block construction involve stitch and flip - more on that later.)


Second, as with machine sewing, all seams are 1/4''.   When I piece by machine, I have a wonderful 1/4'' foot that helps me keep my seams accurate and consistent. When hand piecing, I mark my stitching lines with pencil on the wrong side of the fabric.

I mark my stitching lines as I go - Krisin does all her prep work ahead of time so check out her post to decide which method you'd prefer.

Pictured:  Thread by Aurifil,OLFA Cutting Mat  & Ruler

Line your ruler along the edge of your unit and draw a line that starts and stops 1/4'' from each edge.  I use an ordinary pencil to mark my lines.  (For illustrations purposes, I used my computer to make the line dark and dashed in this photo.)

Pictured: Perfect Piecer by Jinny Beyer

While you can certainly use a ruler, the Perfect Piecer is an ideal tool for marking the stitching lines.  Line up the ruler your fabric and you can make perfectly placed dots in both corners and then connect the dots to draw out your stitching line.


For units like an hourglass block, I'll mark both of the stitching lines that I need for the basic shape.  My marks only go on the wrong side of the background fabric.

Pictured: Perfect Piecer by Jinny Beyer

Once all my basic units are sewn, I lay out the units following the block diagram and then mark the next stitching line.  Stitching lines always start 1/4'' from each edge. In the photo below, the stitching line is going to start right at the spot the prior seam ended.


And remember, seams are stitched through and not over.  (We have more information including a video coming on how to do this.)  As I get ready to join two 4-patches together (for example), I mark just one of the units with the stitching line and pin.  When I get to that existing seam, I will sew through the seam and then continue to the end.

Pictured: Thread by Aurifil, Snips by FamoreRobot Mom Sews Thread Conditioner
Can you see my stitching line? It is just a faint pencil mark.

Bottom line - I mark just the stitching lines I need at each step of the process.  I only mark the fabric that will be on top - that I will actually be stitching on!  All you need is a pencil and a ruler to keep your seams at 1/4'' by drawing out those stitching lines.

Need more visual demonstration?  Check out this awesome video from Kristin!

Most of the items featured can be purchased at Fat Quarter Shop, one of the awesome sponsors for the Hand Pieced QAL! Read more about the products we love to use in our What's in my Sewing Bag post! and more about our awesome QAL sponsors here.

Please note this post contains affiliate links which means I will earn a small commission if you purchase an item.  This does not increase your costs in any way.  

Have a wonderful day! Patty